Showing posts with label desserts. Show all posts

Thursday, October 31, 2024

Glazed Apple Bundt Cake

I made this Bundt cake in Fall of 2023. Our apple tree produced in abundance so I was able to make several different recipes with the bounty from my own tree. Our apples have a unique taste. In 2016, the summer after we got the house, we planted a Fuji Apple tree. What didn't occur to me was that across the lawn the previous owner had planted a Mock Crabapple Tree. Thanks to the bees, our Fuji apples are a little bit smaller and have a very slight tartness to them. It's actually a very pleasant taste.

This Bundt cake is smothered in a buttery brown sugar glaze and so moist and delicious!


Fresh from the oven and this cake looked so perfect that I almost decided not to put the glaze on top.


Just look at that glaze! It was so beautifully perfect.


The kitchen smelled so good!


Look at how beautiful this cake was.
I know I keep saying the word "beautiful" but I seriously, just look at it.


Apple Bundt Cake with Brown Sugar Glaze

Ingredients:

  • 3 c All-Purpose Flour
  • 1 tsp Baking Soda
  • 3 tsp Cinnamon
  • 1/2 tsp Nutmeg
  • 1/2 tsp Salt
  • 1-1/4 c Vegetable Oil
  • 1/2 c Plain Yogurt
  • 1-1/4 c Dark Brown Sugar, Packed
  • 1/2 c Sugar
  • 3 large Eggs, at room temperature
  • 1 Tbs Vanilla Extract
  • 1 c Walnuts, chopped
  • 3 c Apples, 2-3 large, peeled and chopped

Brown Sugar Glaze:

  • 1 c Dark Brown Sugar, packed
  • 1/4 c Unsalted Butter
  • 1/2 c Heavy Cream
  • 1/2 c Confectioners’ Sugar, sifted

Directions:
  1. Preheat oven to 325°F.
  2. Spray a Bundt pan with nonstick spray. Set aside.
  3. Whisk the flour, baking soda, cinnamon, nutmeg, and salt together in a large bowl until combined. Set aside.
  4. In a medium bowl, whisk the oil, yogurt, brown sugar, sugar, eggs, and vanilla together until combined and creamy.
  5. Pour the wet ingredients into the dry ingredients and slowly whisk until no large lumps remain. Try to avoid over-mixing.
  6. Carefully fold in the walnuts and apple chunks.
  7. Spoon/pour the thick batter into the prepared Bundt pan.
  8. Bake for 55–75 minutes or until a toothpick inserted in the cake comes out clean. Keep your eye on the cake after 55 minutes. Feel free to cover the cake loosely with aluminum foil about halfway through to prevent heavy browning on top.
  9. Allow the cake to cool in the pan set on a wire rack.
  10. Then invert onto a serving plate once cooled and ready to serve.

Make the glaze:

  1. As the cake cools, prepare the brown sugar glaze.
  2. Combine the butter, brown sugar, and heavy cream in a medium saucepan over medium heat.
  3. Stir constantly until the butter has melted, and then stop stirring.
  4. Let the mixture come to a rapid boil.
  5. Boil for 1 minute.
  6. Turn the heat down to low, give it a quick stir.
  7. Let simmer for 1 minute.
  8. Remove from heat.
  9. Whisk in the sifted confectioners’ sugar.
  10. Allow glaze to cool and slightly thicken for at least 10 minutes.
  11. Spoon glaze over the cake right before serving. (Cake can still be warm when glazing.)
If your glaze thickened up too much as it cooled, warm in the microwave for 15 seconds and stir until smooth.

  1.  Enjoy!

                Ingrid

Thursday, September 7, 2017

Fastnachts

I had so many wonderful memories as a childhood with my folks. They made certain I always remembered them with fondness. One of my favourite memories was coming home from school on Shrove Tuesday to my Mom making these delicious donuts from her native Germany. She explained to me that fastnacht was made on Fastnacht (the night of fast0 in order to use up lard and flour prior to Lent. I don't think they lasted much past dinner, but then I don't think she made as many as I do.  

I only brought this tradition back to my family in the last few years and they look forward to it every year now. This time I was lucky to have my children home from school because of unused snow days so I could put them to work helping me knead, powder, deep-fry - wherever I needed the help in the hours long process.  

It was worth the time!


Fastnacht

Ingredients:

        2 1/2 cups Milk
        1/2 cup Shortening
        2 tsp Salt
        1/4 cup Warm Water, for proofing yeast (110 degrees)
        2 packets Active Dry Yeast
        9-10 cups Flour, sifted
        1 1/2 cup Sugar
        1/2 tsp Nutmeg
        6 Eggs, beaten
        2 quarts Vegetable Oil, for frying
        Powdered Sugar to dredge


Directions:
  1. Scald the milk, add shortening and salt.
  2. Cool milk until it is lukewarm.
  3. In a small bowl, proof the yeast by adding the warm water to the yeast. 
  4. Let stand 10 minutes.
  5. Add yeast to milk mixture. Stir.
  6. Gradually add 5 1/3 cups sifted flour, beating batter thoroughly.
  7. Put in warm place and allow to stand until full of bubbles.
  8. Mix sugar with nutmeg and combine with beaten eggs.
  9. Stir into first mixture and remaining 3 2/3 - 4 2/3 cup flour.
  10. Knead well, cover and let rise in a warm place for about 1 hour. 
  11. Turn out lightly onto floured board and roll 3/4 inch thick.
  12. Cut with a doughnut cutter or biscuit cutter, shaping into ball or make into twists.
  13. Cover with a thin cloth and let rise on board until top is springy to touch of finger.
  14. Drop into hot fat (375) with the raised side down, so the top side will rise while under side cooks. 
  15. Drain on absorbent paper. 
  16. Toss in confectioners sugar while still warm.

Yields 6 dozen.

Enjoy!

            Ingrid

Monday, September 7, 2015

Old Fashioned Banana Pudding

Is it a pudding or is it a pie? We are a family of banana lovers. This is a take on the banana pudding triffle and so amazingly delicious!


Old-Fashioned Banana Pudding


Ingredients:

        1/3 cup Flour
        1 dash Salt
        2 1/2 cups Milk
        1 (14 oz) can Sweetened Condensed Milk
        2 Egg Yolks
        2 tsp Vanilla Extract
        3 cups Bananas, sliced
        45 Vanilla Wafers
        4 Egg Whites
        1/4 cup Sugar


Directions:  

  1. Mix flour and salt in a large sauce pan.
  2. Add milks and egg yolks to pan slowly, stirring constantly over medium heat, until mixture thickens, about 7-8 minutes, then remove from heat.
  3. Stir in vanilla.
  4. Layer enough banana slices to cover the bottom of a 2 quart casserole dish.
  5. Cover the bananas with 1/3 of the pudding mixture.
  6. Layer with 1/3 of the vanilla wafers.
  7. Repeat layering, starting with bananas, then using pudding, then vanilla wafers.
  8. Do the layering a third time as usual, except do not cover the pudding with wafers.
  9. Place the wafers around the edges of the casserole, tucked into the pudding.
  10. Beat the egg whites at high speed with a mixer until they foam.
  11. Add the sugar gradually, and keep beating until stiff peaks form.
  12. Spread this over the top of the pudding, forming a seal to the edges.
  13. Bake pudding at 325F for 25 minutes or until the meringue becomes light golden.
  14. Allow to cool 30 minutes before serving.
  15. Refrigerate unused portions.

Enjoy!

            Ingrid

Monday, December 8, 2014

Eggnog Fudge

I Love eggnog!
I Love fudge!

When I found this recipe over at An Affair From the Heart and originally from Chocolate, Chocolate and More  I just had to share it with you all.  I can't wait to try it out!


Eggnog Fudge-Smooth and creamy. A subtle eggnog flavor but not overwhelming, the perfect Christmas Fudge.
Eggnog Fudge


Ingredients:
        1/2 cup Butter
        2 Tbs Heavy Whipping Cream
        3/4 cup Eggnog minus 2 Tbs
        2 cups Sugar
        1 10 oz bag White Chocolate Chips
        1 7 oz jar Marshmallow Fluff
        1/2 tsp Nutmeg
        2 tsp Vanilla Extract


Directions:
  1. Line a 9×9 baking dish with foil and butter well.
  2. In a medium saucepan combine butter, eggnog, cream and sugar.
  3. Bring to boil over medium heat stirring occasionally. 
  4. When it boils, reduce the heat and continue cooking until candy thermometer registers 234 degrees. (soft ball stage). 
  5. Remove from heat and stir in white chocolate chips. 
  6. Stir until combined.
  7. Add marshmallow, nutmeg and vanilla.
  8. Stir until smooth.
  9. Spread into prepared pan.
  10. Garnish with a sprinkle of nutmeg on top.
  11. Let cool at room temperature.
  12. Then place in refrigerator.
Store in refrigerator for up to 3 weeks.


Enjoy!


            Ingrid

Monday, February 11, 2013

Peanut Butter Cup Brownie Bottom Cheesecake

I found this recipe floating around the inter-web so I'm not sure who to give credit for it.  I do have to say to whoever came up with this recipe:

☆.•♥•This is HEAVEN in a Cheesecake form•♥•☆


Peanut Butter Cup Brownie Bottom Cheesecake

Ingredients:

Brownie Crust:

        6 Tbs Unsalted Butter, melted
        1 1/4 cups Sugar
        1 Tbs Vanilla Extract
        2 Eggs
        1 cup Flour
        1/3 cup Unsweetened Cocoa
        1/2 tsp Baking Powder
        1/2 tsp Salt
        1 cup Semi-Sweet Chocolate Chips
        1 cup Peanut Butter Chips

Cheesecake Filling:

        2 lbs Cream Cheese, softened
        5 Eggs, at room temperature
        1 1/2 cups Brown Sugar, 
firmly packed
        1 cup Smooth Peanut Butter (not natural-style)
        1/2 cup Whipping Cream
        1 Tbs Vanilla Extract


Decoration:

        1/2 cup Whipping Cream
        1 cup Semi-Sweet Chocolate Chips
        1 cup Peanut Butter Chips
         6 Peanut Butter Cups, cut carefully in half


Directions:

  1. Heat oven to 350°F .
  2. Grease 9-inch Springform pan with butter.
  3. Stir together butter, sugar and vanilla in large bowl with spoon or wire whisk. 
  4. Add eggs; stir until well blended. 
  5. Stir in flour, cocoa, baking powder and salt; blend well. 
  6. Spread in prepared pan.
  7. Bake 25 to 30 minutes or until brownie begins to pull away from side of pan. 
  8. Meanwhile make cheesecake layer (see below).
  9. Immediately after removing brownie from oven, sprinkle milk chocolate chips, peanut butter chips and peanut butter cups over brownie surface. 
  10. Spoon cheesecake mixture over chips. 
  11. Turn down oven 325°.

Cheesecake Filling: (makes extra)

  1. Beat cream cheese in bowl of electric mixer until smooth.
  2. Add eggs, one at a time, beating well after each addition.
  3. Add sugar, peanut butter and cream; 
  4. Mix until smooth.
  5. Stir in vanilla.
  6. Pour filling into prepared crust.
IF SOME BATTER IS LEFT OVER, EITHER STORE OR PUT IN SMALLER SPRINGFORM PAN.

Directions, continued:

  1. Double-wrap Springform pan with aluminum foil to prevent water seeping inches.
  2. Place Springform pan into a larger baking pan.
  3. Pour hot water into the larger pan so that the water comes 1 inch up the sides of the Springform pan.
  4. Bake at 325 degrees 1-1/2 hours, or until firm and lightly browned.
  5. Remove from the oven and allow to cool on a wire rack for one hour.
  6. Run a knife along the edge of the cake to loosen it from the pan somewhat.
  7. Refrigerate for at least 4 hours before decorating.

Decoration: (makes a lot extra-try using it on individual slices after cutting).
  1. Remove cake from pan and put on a pretty plate.
  2. Bring whipping cream to boil in a small saucepan.
  3. Remove from heat and add semi-sweet and peanut butter chips. 
  4. Stir, stir, stir until melted and smooth.
  5. Drizzle over cake
  6. Add peanut butter cup halves around the edge of the cake.

Enjoy!

            Ingrid

Wednesday, January 30, 2013

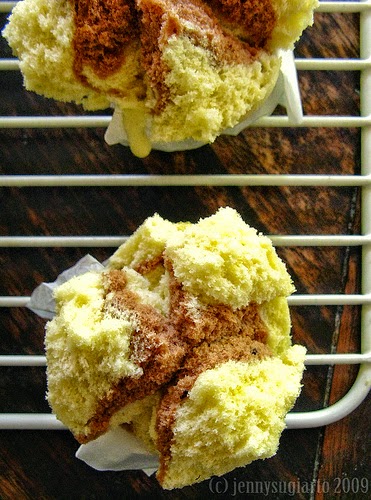
Roti Kukus (Indonesian Steamed Cake)

They are soft, moist and spongy. and so good. It's been a while since I've had them but they are so good!


Roti Kukus


Ingredients:

        3  Egg Yolks
        1  Egg White
        1 3/4 cup  Caster Sugar (substitution below)
        1 3/4 cup Flour
        1/2 cup Sprite
        1 tbsp Cocoa Powder

Directions:

  1. Prepare steamer. Line roti kukus molds with parchment paper.
  2. Beat egg yolks, egg white, and caster sugar until thick and pale.
  3. Fold in 1/3 of the flour, then 1/2 of the sprite.
  4. Gently mix
  5.  Repeat with remaining flour and Sprite, ending with flour.
  6. Mix thoroughly until there is no lumps in the batter.
  7. Divide 1/3 of the batter into a small bowl and add cocoa powder. 
  8. Whisk until thoroughly combined.
  9. Spoon white batter into moulds.
  10. Swirl a little of the chocolate batter.
  11. Steam for 15-20 minutes on high heat.

Notes:

    It is best to steam them in small quantity at a time. Unlike common cake batters         which should be baked immediately, this batter can stand quite long.
    Do not open the steamer during the first fifteen minutes. Peeking can cause the         rising of the cake to stop.
    Muffin molds may be used for this cake and it turns nice too.
    Spread Irish butter on the cakes.

Makes 10 cakes.


Substitutions:

Castor sugar may not be easy to track down, but it is easy to make. In fact, it's really nothing more than granulated sugar that has been ground to a super-fine consistency. 

Here's how to make your own castor sugar in seconds:

Preparation:
  1. Place granulated sugar in a food processor or blender.
  2. Pulse until it reaches a super-fine, but not powdery consistency.
  3. Allow the sugar to settle for a few minutes.
  4. Then, use in place of the castor sugar for your recipe.

Enjoy!

            Ingrid